Address Space
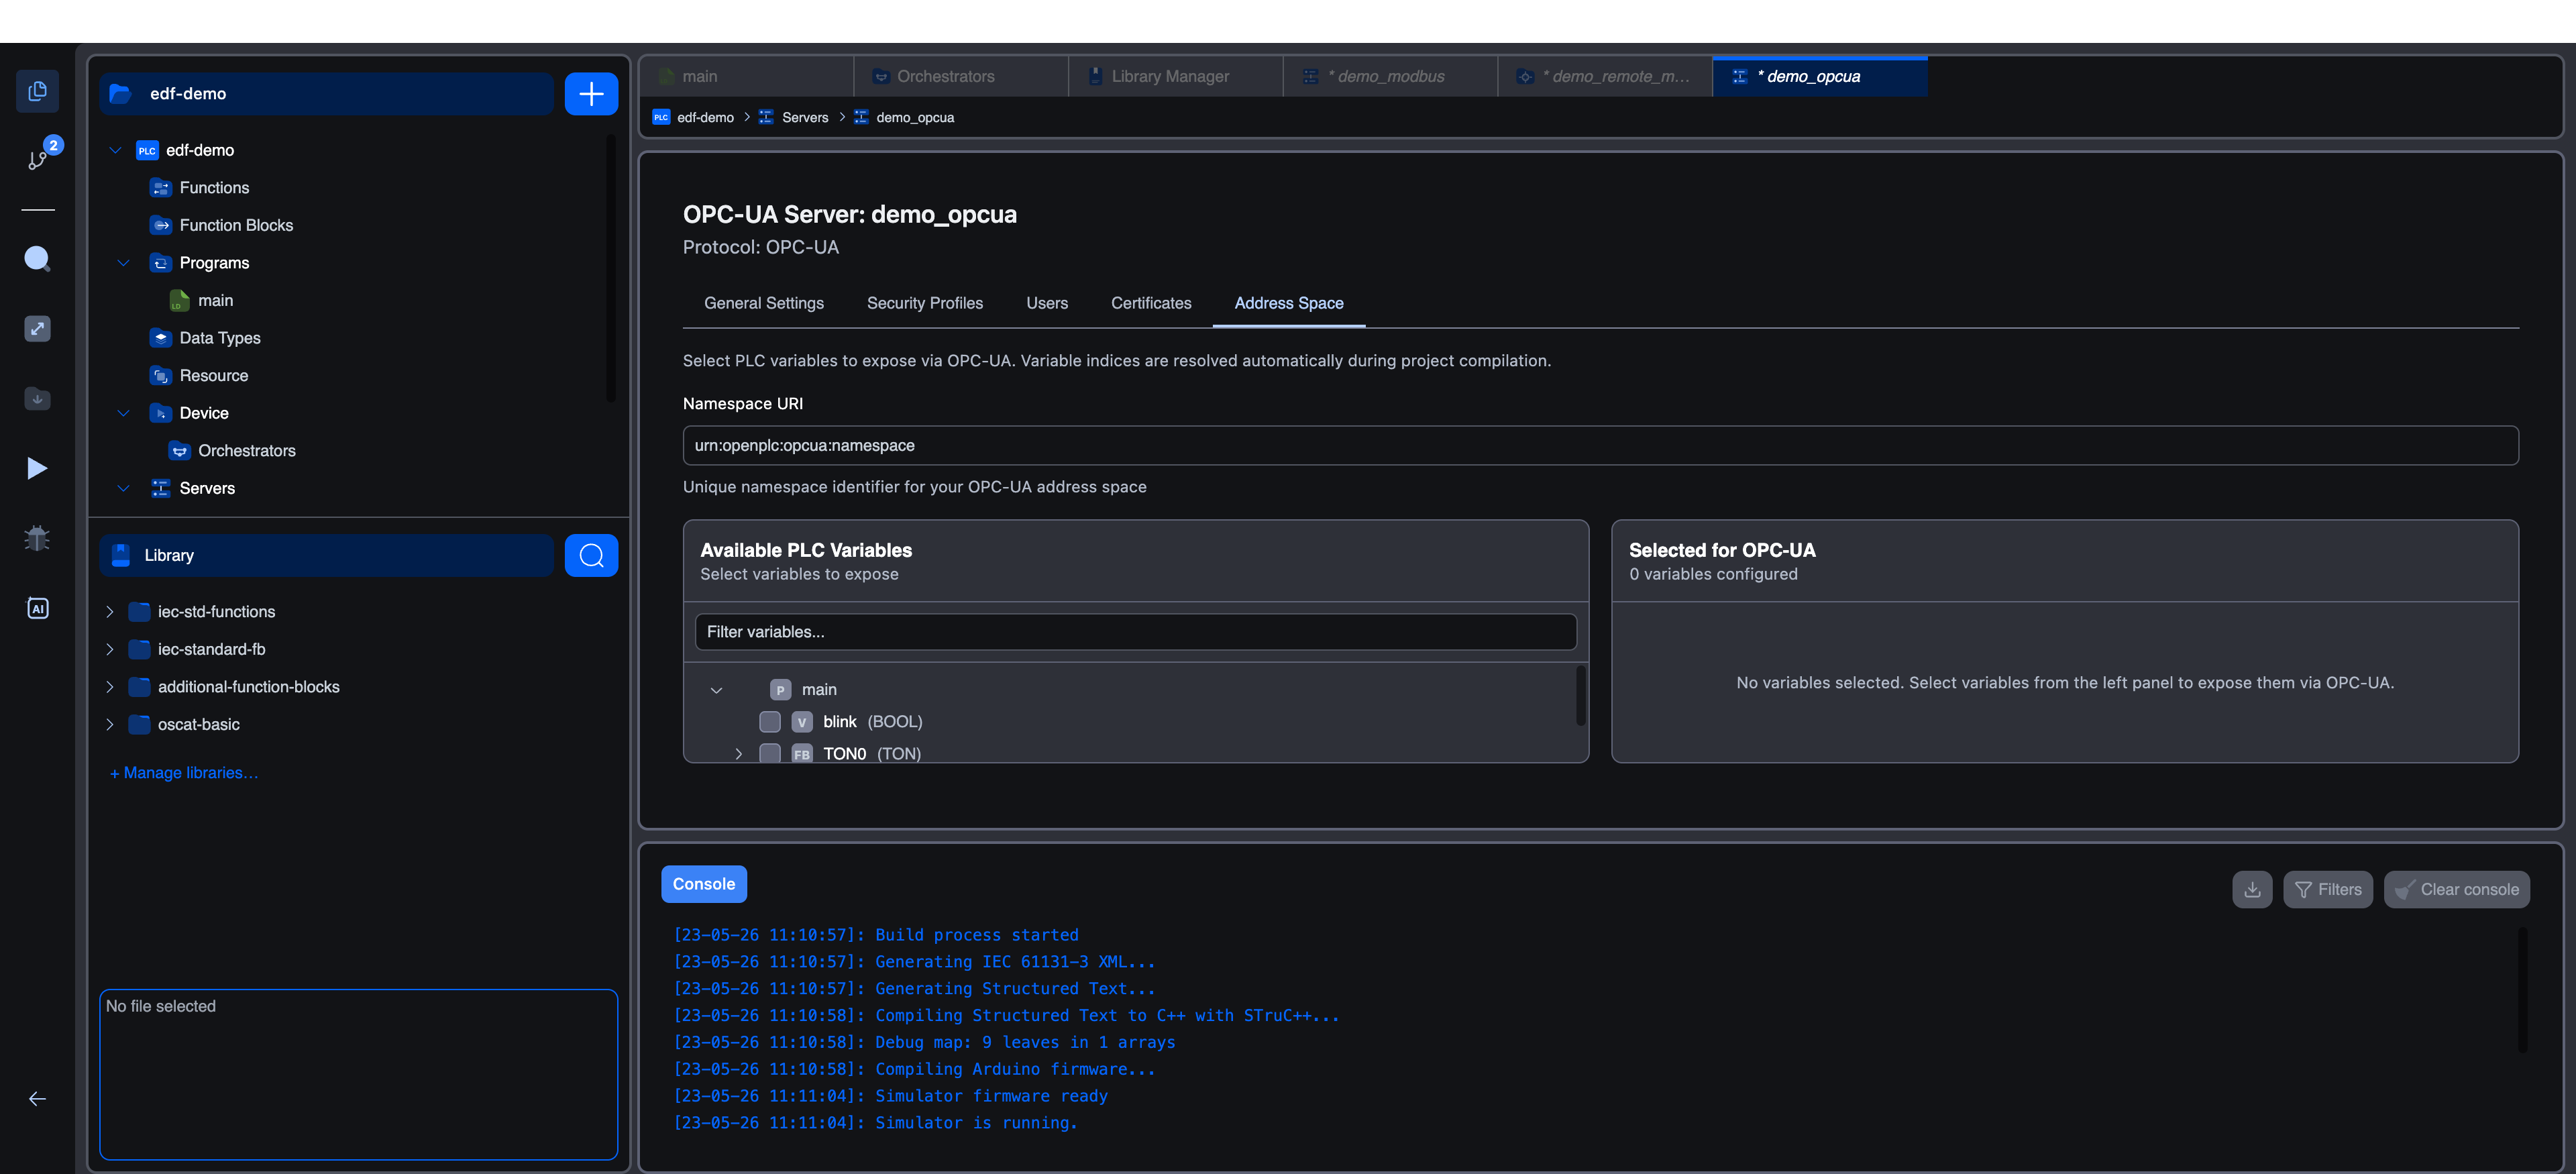
The Address Space tab is where you choose which PLC variables to expose through OPC-UA and how each user role is allowed to interact with them. The on-screen description reads: "Select PLC variables to expose via OPC-UA. Variable indices are resolved automatically during project compilation."
The tab has three areas: a Namespace URI field at the top, a split pane with the available variables on the left and the selected variables on the right, and a configuration modal that opens whenever you select or edit a variable.
Namespace URI
The Namespace URI sets the OPC-UA namespace under which all your exposed variables live. The helper text reads: "Unique namespace identifier for your OPC-UA address space."
| Field | Default | Editable on this tab? |
|---|---|---|
| Namespace URI | urn:openplc:opcua:namespace | Yes |
The same value is shown read-only on the Namespace Configuration section of the General Settings tab. Editing it here updates both views.
Available PLC Variables
The left panel shows every variable in the project as a hierarchical tree. The header reads Available PLC Variables and the subtitle is "Select variables to expose". A Filter variables... input at the top of the panel narrows the tree to nodes whose name matches what you type.
Each node in the tree carries a small badge showing what kind of element it is:
| Badge | Meaning |
|---|---|
P | Program (POU). Expandable container of variables. |
V | Simple variable. Selectable for OPC-UA exposure. |
FB | Function block instance. Selectable as a structured node. |
S | Structure (user-defined data type instance). Selectable as a structured node. |
[] | Array. Selectable as an array node. |
Click the chevron on a Program or container node to expand or collapse it. Click the badge or name of a selectable item to open the Configure OPC-UA Node modal.
When you select a structured item (function block, structure, or array), the editor automatically generates default field definitions for every member, mirroring the structure inside OPC-UA. You can adjust permissions field-by-field after that.
Deselecting a structured item also removes all of its descendants from the address space.
Selected for OPC-UA
The right panel lists the variables that are currently exposed. The header reads Selected for OPC-UA and the count line reads, for example, "3 variables configured". When the list is empty, a placeholder reads: "No variables selected. Select variables from the left panel to expose them via OPC-UA."
Each card shows:
- A small badge.
Vfor variables,Sfor structures,[]for arrays. - The Display Name in bold.
- The Node ID below it.
- An Edit button (re-opens the Configure OPC-UA Node modal).
- A Remove button (drops the variable from the address space).
- A details block with the source PLC variable, its type, and a permissions summary in the form
V:r O:rw E:rw.
Configure OPC-UA Node Modal
Selecting a variable from the left panel. Or clicking Edit on the right. Opens a modal titled Configure OPC-UA Node (or Edit OPC-UA Node when editing). The modal pre-fills sensible defaults that you can override.
Variable Info
A grey info box at the top shows:
- PLC Variable:
<POU>:<variable path>(for example,main:ked). - Type: the IEC 61131-3 type.
These two values are read-only. They describe the source variable.
Identification
| Field | Type | Default | Description |
|---|---|---|---|
| Node ID | Text, max 128 chars | Auto: PLC.<POU>.<variable path> | Unique identifier in the OPC-UA address space. The helper text reads "Unique identifier in the OPC-UA address space." Must be unique across all exposed nodes. |
| Browse Name | Text, max 64 chars | Auto: last segment of the variable path | Name shown when clients browse the address space. |
| Display Name | Text, max 128 chars | Auto: human-readable form of the variable name | Name shown to operators in client UIs. |
| Description | Text area | Empty | Optional free-text description of the node. |
| Initial Value | Text | Auto from type (false for BOOL, 0 for numerics) | Value the OPC-UA node holds before the PLC writes its first update. The helper text reads "Default value when the OPC-UA server starts." |
Access Permissions
A grey Access Permissions panel contains three dropdowns, one per role. Each dropdown offers three options:
| Option (as shown in the UI) | Effect |
|---|---|
| Read Only | The role can read the value but not write it. |
| Write Only | The role can write the value but not read it. |
| Read/Write | The role can do both. |
The defaults for a new node are:
| Role | Default |
|---|---|
| Viewer | Read Only |
| Operator | Read Only |
| Engineer | Read/Write |
The on-screen helper text reads: "Configure access permissions for each user role."
Array Information
If the source variable is an array, a cyan-coloured Array Information box shows:
- Dimensions: the array bounds, for example
[0..9]or[1..3, 1..3]. - Element Type: the IEC type of each element.
- Total Elements: the total number of elements.
This panel is read-only.
Structure Information
If the source variable is a structure or function block, a Structure Information box shows:
- Type: the IEC type name (for example,
TON). - Fields: the number of member fields.
Field Permissions
For structures, function blocks, and arrays, an additional Field Permissions table appears below the parent permissions. Each row is one field with three role-specific permission dropdowns rendered as compact R / W / RW selects.
A button labelled Apply Parent Permissions to All copies the parent's Viewer / Operator / Engineer permissions to every field, including nested fields. Use this when you want all members to share the parent's access policy, then adjust individual rows where needed.
The footer text reads: "Configure individual permissions for each field. Use 'Apply Parent Permissions' to set all fields to match the parent variable."
Validation
The validation messages displayed by the modal include:
- "Node ID is required"
- "Node ID must be 128 characters or less"
- "A node with this ID already exists"
- "Browse name is required"
- "Browse name must be 64 characters or less"
- "Display name is required"
- "Display name must be 128 characters or less"
Saving
The primary button reads Add to Address Space for new nodes and Save Changes when editing. Cancel discards the form.
IEC 61131-3 to OPC-UA Type Mapping
The runtime maps each IEC 61131-3 data type to an OPC-UA built-in type. You do not select the OPC-UA type yourself. It is chosen automatically based on the source variable's IEC type.
| IEC 61131-3 Type | OPC-UA Built-in Type |
|---|---|
BOOL | Boolean |
SINT | SByte |
USINT / BYTE | Byte |
INT | Int16 |
UINT / WORD | UInt16 |
DINT | Int32 |
UDINT / DWORD | UInt32 |
LINT | Int64 |
ULINT / LWORD | UInt64 |
REAL | Float |
LREAL | Double |
TIME | Int64 (milliseconds) |
STRING | String |
| Structure / FB instance | OPC-UA structured node with one child per field |
Array of T | OPC-UA array node with element type from the table above |
Best Practices
- Keep your address space focused: expose only the variables the client actually needs. A smaller address space starts faster and is easier for operators to navigate.
- Use the role permissions to enforce safety. Viewers should never be able to write to setpoints; operators should only write where the process tolerates it; reserve all configuration writes for engineers.
- Choose Node IDs that include the source POU name. The auto-generated
PLC.<POU>.<path>form is usually a good fit. - Store free-form context in the Description field. It shows up in client browsers and helps operators understand what each node does.
What's Next?
- Worked Example: see the address space wired up end-to-end with a worked configuration.
- Users: confirm your role assignments match the permissions you set per variable.
- General Settings: review the cycle time if address-space updates feel too slow or too fast.
On This Page